Thursday, September 15, 2011

To the Beach! Saturday 10 September 2011

Last week-end we decided to take off to the coast. This time (if you remember reading previously about our failed attempt to circumvent the OP (Olympic Peninsula)) we planned it out. What could we do in one day? We decided on the beach since it was probably the last nice weekend before the rainy season (in the upper 80's and clear skies).


Kalaloch was perfect for a day-trip because it was "beachy" and there was a lodge, gas, and short trail.
It took 3 hours from our house to get there. We stopped at the ranger station for some advice before having lunch in our van. 


We took a walk on the beach and played on the logs (the old ones high on shore - not the ones in the surf). By the way, it is COLD on the beach! We wore shorts and t-shirts while the rangers come out in pants, long-sleves, and fleece jackets and hats. I guess we still have not learned that this is the PacNW and the weather is different in different places. Check the destination weather, even if it is only a few minutes away. Duh! We already know the it can be sunny at work and totally raining at home.


Enjoyed a Ranger talk about the whales and birds and whatever else caught our fancy. 


Took a walk on the Kalaloch Creek Nature Trail. The trail is about 45 minutes in a loop. Fairly easy gravel path with a minor 40 ft elevation change which seems to be mainly in a section where you go up and down a primitive stairway along the creek. The scenery is ethereal. Fallen trees create mini worlds of vegetation and shelter. Moss hangs from branches where sunlight peeks gently through to reveal glimpses of red huckleberries and fern. The trail is dodgy in some parts because the boardwalk was moist and slick or boards were loose and in need of repair. It can get tricky in a few parts as to witch direction so just stay on the boardwalk or gravel and you will do fine. Afterall it is just a loop.

 
Then it was time to head back. We stopped at the Ranch house BBQ place along the way.

Over-all, it was not worth the 6 hours drive. We have resigned to the conclusion that if we are going to do the OP, we will have to plan a weekend of it in order to truly enjoy it.

Wednesday, September 7, 2011

New Garden Plot

I decided to put my garden in the well-house field. Why? It has the best sun coverage and is close to the house. Problem is that it is the well-house lot. Meaning, half of it is covered in large rocks layed for the drilling equipment and it also has water pipe underground to the house. Unfortunately, no one can find the location of the trenching. So, I will be needing to build raised beds and plan an intensive garden. No easy parallel tilling and planting. No problem, just a little more work involved.

I started by planning a bed off of the well-house since it was a constant variable in the plot and had a minimal amount of surface rocks.
I measured a 4' access path between the building and beds. Make a straight line off the face and back of the building to the wall and measured anther 4' access path from the edge of the rockwall bed. The beds measure 3' across for easy access with 2.5' walking paths between, with the exception of the end bed portion that measures 5'.

Phase 1 pump-house beds
I started by spraying the area with glyphosate (read the labels and follow directions!). I then lay out rocks on my measurements to see how it would look and feel. I then trenched the lines with a spade, built the edging from the rocks in the field, covered the beds with paper and 12" of cut hay from the field. Phase 1. This process took 5 days.

Phase 1
Phase 1
I then took some time to fix the rock wall rock bed to even it out and remove most of the plastic from under the rocks. Note - Putting plastic under the rocks does not prevent weeds, they just germinate on top of the plastic and grow through. It also makes a place for water to pool and create a STINKY, mosquito infested pool of stagnant grossness!

Phase 2 took a week to complete.
Phase 2
The north side beds consist of 2 separate 3X7ish beds and a U shaped bed on the end. The separate beds were scalped and filled with dirt and compost for immediate fall garden use. This decision was made because while trenching, I found the ground was wet in a section and suspected a water main leak :-(. I dug around and determined it was just from the protection from evaporation by that  huge pile of brush that was on top for months and the heavy clay consistency of the topsoil at that location.


Phase 3 will have to wait. I am tired of digging and stacking rocks. I think 1000 sq feet is enough for now. Now comes the expense of deer fence. That will be in the projects section.

I have planted seed of spinach and black seeded Simpson lettuce in bed 1 (since that is the only bed I have enough fence for right now).


Mower and Cart

We needed a riding mower soon or we are going to end up buying the neighbor a new mower (since we have been paying him to mow our lawn the past few months). Our 7-blade push reel mower worked great on our tree-less suburban 0.2 acre bermuda lawn in TX. Not so much here in the moist, acre of soft grass filled with tree-litter and rocks and dirt thrown up by moles.

I shopped around for a "no-project" lawnmower with bagger. I wanted to be able to get it and start mowing and not spend a fortune fixing one up.
Ok, Ok ... having my hubby fix it up ;-).

I called some ads and no one called back. Well, I thought I found one about 2 hours north of home that came with a cart and bagging system. The lady called back and I loaded up the truck with my kid, rented ramps and put a mortgage payment worth of fuel in the tank and headed toward Canada (mistake #1 - too far from home).

Ad said excellent condition and owner said they kept it under a tent when not in use. (mistake # 2 - it's not excellent if it's  "out of the box"). It looked decent, engine sounded good to me (didn't skip or chug or smoke or explode) and it ran and all the parts seemed to work. Keep in mind - no hubby with me (mistake #3 - always have your mechanic look it over b-4 u buy).

Hubby fixing it up
I get it home and hubby decides to clean it up which, of course, leads to taking the thing apart (that's a gear-head for you).
Come to find out, the deck is rusted and had stress cracks, 2 spindles need to be replaced, the strippers are stripped, needs a pulley, blades are super dull, wheel is bent, needs filters, oil, etc..., etc.... ca-ching ca-ching. Ugh!

Did I mention I did not want a  "project mower" (mistake #4 - if it's not new, its a project).


At least I have something to blog about ;-)
Here is our project:

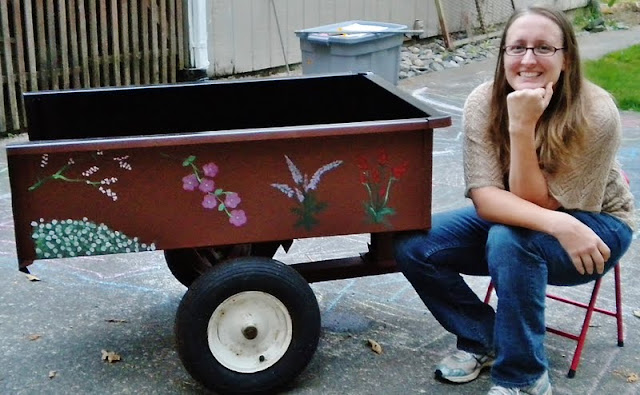
Cart: 
 before (with the exception of the new wheel we just bought)


 AFTER sanding, washing, priming painting and art.

 I did one side.  
        
My daughter did the other.


The mower itself looked good. It was mainly the deck that had to be re-built (a new one costs over $400 smackers). The rebuild put us back about $200 (in addition to the cost of the purchase)- that was for parts, shipping, paints and sanding supplies, no-flat wheel (not including the 2 weeks it put us back in our time to fix it). 

At least my "mechanic" said the engine was good and the mower itself was in decent condition.

Now lets' get to mowing this mess!