Showing posts with label interior. Show all posts

Tuesday, December 24, 2013

November 2013

Cleaning out the photos (over a year later :-/)

Here are a few photos of fall-early winter of 2013.

Installing and painting the old pantry from the kitchen wall we tore out and re-purposing as built in storage.

Moved the wood drying shed from the orchard to the meadow and replaced the roof.
Filling in with the fallen maple from the west side.

Experimenting roasting a squash in the new woodstove.

Baking

Feels like the Holidays

Lichen for Santa's Reindeer Christmas Eve


Friday, November 8, 2013

I don't need to cope.

How to cut crown molding with a miter saw and NOT have to cope.

* Don't be a dummy. Be safe when handling power tools by following manufacturer's instructions and always using appropriate safety equipment. *

My order of crown molding arrived and I watched a few how-to videos about cutting and installing.
All of them said you have to cope some joints. Coping is taking a fine hand saw and manually cutting an angle so the corners fit.

If you know me, I thought there HAS to be a better and easier way!
So I played with a scrap for about 5 minutes and found the answer.
C'mon guys! I am not a pro contractor or an engineer and it took me FIVE MINUTES to figure it out.

This is not an all-inclusive how to on crown molding - just a description of the 2 cuts to make to get 4 different 45 degree corners WITHOUT having to cope.
I don't do videos so, I hope this visual helps you to make quick and easy interior and exterior corner cuts for your crown molding install.

Tips:
Not all corners are square.
I cut about 1/4 inch longer than measured to give a little wiggle room to adjust.
Be prepared to make lots of minor adjustments because your house may not have square corners.
Order a few more pieces than you need because 1) there WILL be damaged peices in the shipping 2) you can practice with one 3) you can be less stressed about making a mistake 4) you have extra in case something happens later on.


EXTERIOR CORNERS


Exterior Right Corner

Set the saw angle at 45   pointed to the Right.
Set the molding upside down on the saw.
The corner you are cutting needs to be facing toward the Right and on the left side of the blade.


My hand is there to hold the molding for photo only
Exterior Left corner

Pretty much opposite of the right side.
Set the saw angle at 45   pointed to the Left.
Set the Molding upside down on the saw.
The corner you are cutting needs to be facing towards Left and on the right side of the blade.


As seen in the photo above... one cut makes 2 different corners. It depends on what side of the blade your cut is as to the corner you are making. Make sure your cut is lined up. I mark the bottom edge of the molding that touches the wall on the back side of the molding and line that up. But, there are other tutorials on the web that can show you how to measure. 


INTERIOR CORNERS

Inside Left corner
This is an Inside Right Corner cut.

Set the Saw angle at 45  pointed to the Right
Set the molding upside down on the saw.
The Corner that you are cutting needs to be facing toward the left to make the cut on the right side of the blade.


Inside Right corner

Set the saw angle at 45  pointed to the Left.
Set the molding upside down on the saw.
The corner you are cutting needs to face toward the Right to make the cut on the left side of the blade.


So, That is it. Easy peasy.

More tips... I painted mine BEFORE cutting and installing. SO way EASIER!
I also used carpenters wood filler putty to smooth the joints, fill any gaps and fix minor damage. It can be sanded and painted over for a smooth and seamless look.


Tuesday, May 28, 2013

Tearing Down the Wall Phase 2

Phase 2 of tearing down the wall project.

We had several contractors come out to do bids and inspect the wall to be sure it was not load bearing.

After we actually exposed the wall - it was obvious and if we had just gone in the attic and peeled back the insulation, we could have easily seen it was not a structural wall being that the top beam was a 2x2 AND it was not even attached or touching the rafters/ roof structure or beams etc...

So, phase 1 was the kitchen light.
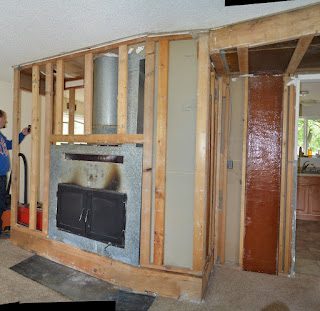
Here on Phase 2 we tear down the wall and expose the water heater and upper drywall for the contractor to come in and take care of. We remove the furnace.


Before:

from the southeast corner of the LivingRoom

from the south west corner of the LivingRoom

From the northeast corner of the diningroom

from the northwest corner of the kitchen

from the hallway facing east


One day of work getting the electricity sorted was a whole day for the hubby.
I worked on the drywall.


not a load-bearing wall - the 2x2 gives it away :-/
Yup, that is a forklift hole - this was a prefab house.


2nd day hubby finished up electrical and removed the furnace.


from down the hall


Day 3 we split the cabinet and moved the halves to a temp location until I can get an island figured out and built. Hubby worked on more electrical and did demo, removed duct work etc.
We ended up removing the upper drywall because it was just setting on top of the wall and it was practically falling down anyway. Sorry contractor, we will have to re-write the contract.
Our ceiling is now opened to the attic.


Wednesday, December 21, 2011

Cave

the red is carpet pad for spacial reference
The day before Thanksgiving, the basement leaked.
There had been a huge rain for 2 days straight. I guess the soil just could not drain it away fast enough and the split along the floor-wall seam didn't help.
We pulled up the carpet and put down a bunch of old towels.


The next day I cooked while Mark pulled the wood slat siding off the wall.


Then, we enjoyed a great Thanksgiving when my sister and her hubby came up from the Salem area for an over-nite visit. It was so good to see them!

The day after Thanksgiving we said farewell to family and got busy on the repairs.
Cracks were sealed with hydrolic cement. Paint was scraped, sanded and chemically peeled. That was the hardest part.

The wall was cleaned, which took forever. Then he sealed it with concrete sealer (white). When he decided on the color, we went out and got tinted primer and red paint. Little did we know that although you need 2 gallons of paint, you only need a gallon of primer. Know anyone who wants pepto-pink primer?


Red paint is up and so is the shelf and borders. Just the details are left.


Here is a closeup of the wall and ledge all done.